How to Create Journal Ready Blot and Gel Figures: blot gel figure guidelines
In This Article
blot gel figure guidelines for journal ready submissions
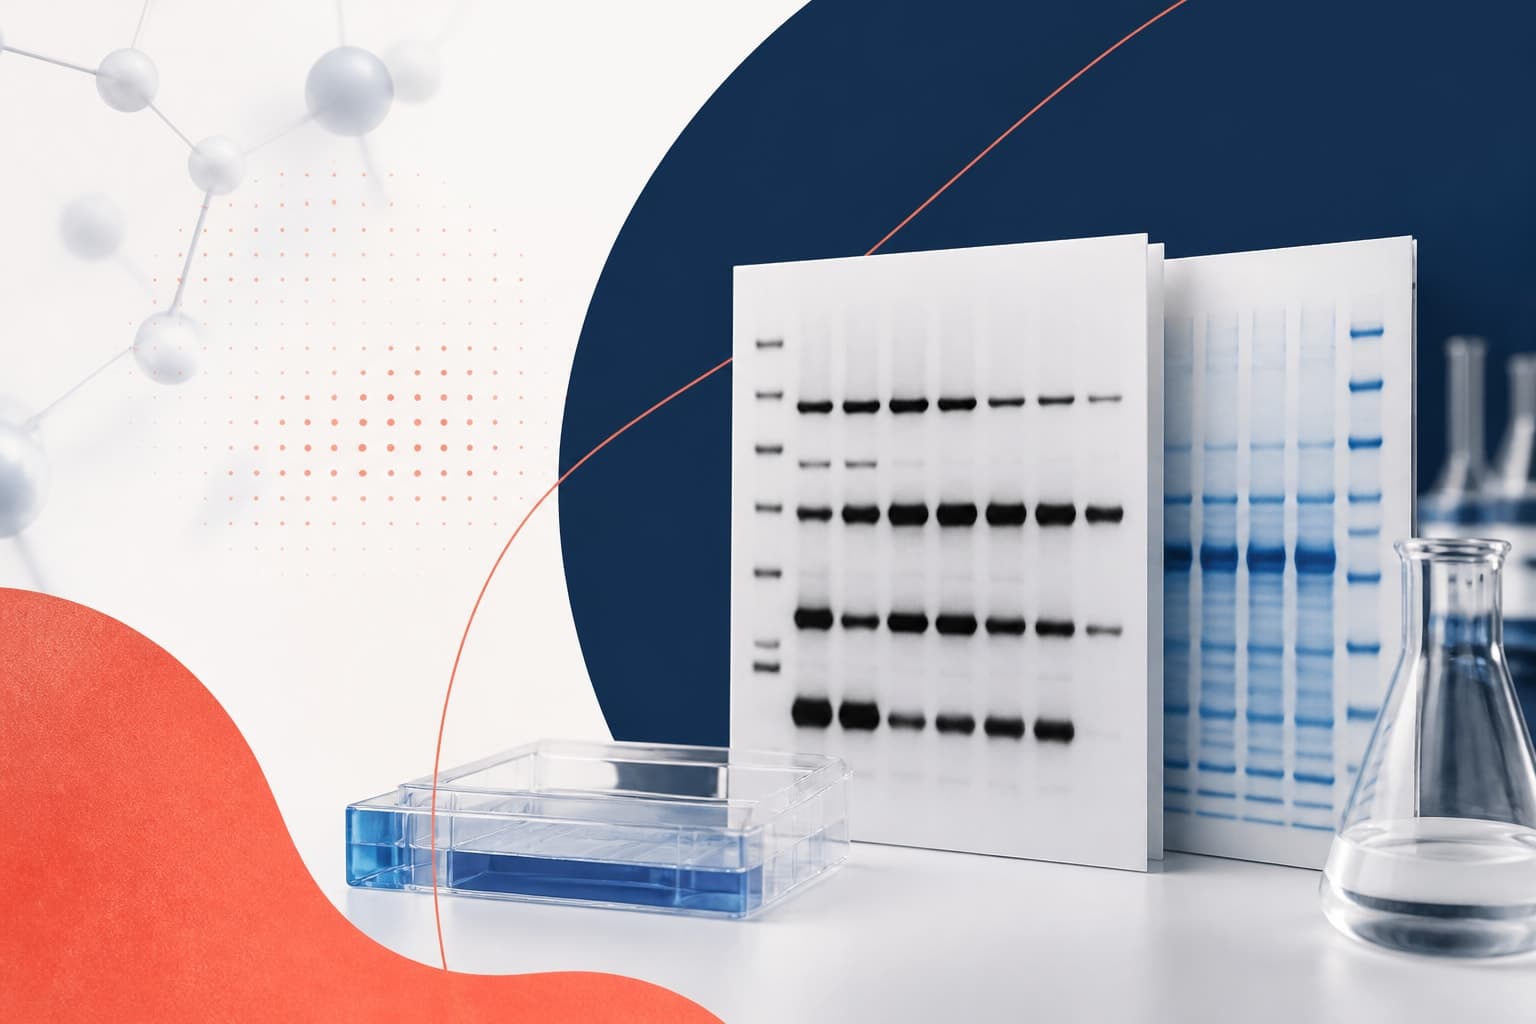
If you are preparing western blots, northern blots, southern blots, SDS-PAGE gels, agarose gels, or immunoblots for publication, blot gel figure guidelines are not optional decoration. They are part of the scientific record. A clean figure should help reviewers understand what was measured, how samples relate, where controls appear, and whether any lanes were removed or rearranged. The goal is not to make the gel look perfect. The goal is to make the evidence readable without hiding anything important.
Journals now examine image data more closely than ever, and many ask for uncropped source files during review or after acceptance. Some use screening tools, while others rely on editors and image integrity specialists. You can reduce avoidable questions by building figures with a consistent, transparent workflow from the first crop to the final upload.
This guide focuses on four areas that cause the most trouble: cropping, controls, splicing, and raw-image preparation. We will also cover file naming, annotations, contrast, and export choices. If you want to build cleaner scientific panels faster, you can create with Graffiy and keep visual consistency across your journal figures.
Start with the journal rules, not the figure file
Before you crop a single lane, read the target journal image policy. Many journals follow similar principles, but details vary. Some require full-length blots for every figure. Some require molecular weight markers in the main figure. Others allow cropped panels in the article, provided the full scan is supplied as source data or supplementary information.
Author instructions often define what counts as unacceptable manipulation. Typical red flags include selective enhancement, erased bands, duplicated lanes, undisclosed lane removal, and contrast changes applied to only part of an image. A useful external reference is the Nature Portfolio policy on image integrity and standards, which explains common expectations for figure preparation and source data.
Do not wait until submission to check these rules. Retrofitting a panel after coauthors have approved it is painful. Even worse, you may discover that the raw scan is missing, the ladder was cropped away, or the exposure used in the figure is not the one described in the methods. Good blot gel figure guidelines begin at acquisition, not during final layout.
Cropping blots and gels without losing context
Cropping is allowed in most journal figures, but it must not misrepresent the experiment. A crop should remove empty space and improve readability while preserving the relationship between lanes, controls, markers, and relevant bands. If a crop changes the perceived result, the crop is too aggressive.
Keep enough vertical space to show the band of interest and nearby background. For western blots, include molecular weight labels when they help identify specificity. If a nonspecific band supports your interpretation or complicates it, think carefully before excluding it. Reviewers may ask why only a narrow slice was shown.
Horizontal cropping needs the same care. If adjacent lanes were part of the same experiment, cropping out intervening lanes may be acceptable only when disclosed. If you remove lanes, indicate the break clearly and explain it in the legend. Never close a gap so tightly that separated lanes appear adjacent in the original membrane.
A practical rule is simple: every cropped panel should be traceable to the uncropped image in seconds. If a reviewer opens the raw file, they should find the displayed lanes, band positions, exposure, and labels without guessing. Keep a copy of the crop boundaries or a marked reference image for your lab records.
| Crop choice | Usually acceptable | Risky or unacceptable |
|---|---|---|
| Vertical crop | Shows band of interest plus enough surrounding background | Shows only a thin band strip with no context |
| Horizontal crop | Removes empty margins while preserving lane order | Removes sample lanes without disclosure |
| Ladder crop | Includes relevant marker labels or provides them elsewhere | Deletes marker information needed to assess size |
| Background crop | Removes blank membrane outside the informative area | Hides artifacts that affect interpretation |
Controls must be visible, labeled, and matched
Controls are where many blot and gel figures either become convincing or fall apart. A loading control, input control, positive control, negative control, untreated sample, knockout sample, or molecular weight marker should be labeled so readers understand why it is present. Do not assume the legend alone can rescue a confusing panel.
For western blots, match loading controls to the same sample set and experimental context. If the target protein and loading control come from the same membrane, state whether the membrane was stripped and reprobed or cut before incubation. If they come from replicate gels or different exposures, disclose that. These details matter because they affect how readers interpret normalization.

For gels, include markers and controls that support identity and size. PCR gels should show a DNA ladder and appropriate positive and negative controls. Coomassie gels and silver stains should include sample identity, loading amount when relevant, and marker positions. The figure should not force readers to search the methods for basic orientation.
Use consistent lane labels across the figure, legend, and raw-image files. If lane 1 is vehicle in the main panel, it should not become control in the source file without explanation. Small inconsistencies invite big questions. Clear blot gel figure guidelines protect you from that avoidable confusion.
Splicing, lane removal, and rearrangement
Splicing is one of the most sensitive parts of blot and gel figure preparation. It is not automatically misconduct. Researchers often remove irrelevant lanes, combine nonadjacent lanes from the same gel, or place related samples next to each other for readability. The problem begins when splicing is invisible or unexplained.
If lanes were removed from a single blot or gel, mark the splice with a thin dividing line, a small gap, or another journal-approved indicator. The visual cue should be clear but not distracting. Then explain the change in the figure legend, such as, nonadjacent lanes from the same blot are separated by vertical lines.
Do not combine lanes from different gels, different membranes, or different exposures as if they are one continuous experiment. If combining separate experiments is scientifically justified, separate the panels visually and describe the relationship honestly. For example, you can use separate boxes or panel labels and state that samples were run on parallel gels under the same conditions.
Maintain original lane order whenever possible. Rearrangement may make a figure easier to read, but it also increases the burden of disclosure. If you rearrange lanes, keep a raw annotated map showing original positions. That map can prevent confusion when coauthors, editors, or reviewers ask for source data months later.
Practical standard: if a reader might infer that two lanes were adjacent in the original image, and they were not, you must make the separation visible and explain it.
Contrast, brightness, and background adjustments
Image adjustment should improve visibility, not change the data. Most journals allow linear adjustments to brightness and contrast when applied to the entire image. Adjusting only one lane, one band, or one region is a serious problem unless it is part of a disclosed quantitative method and not used to mislead.
Keep the original raw file untouched. Work on copies, and record any adjustments made for the figure. If your software uses levels, curves, gamma, or background subtraction, note the settings. When possible, use the same adjustment settings for comparable panels in the same figure.
Avoid overcontrasting until background disappears. Very clean blots can look suspicious when the source image shows a more complex background. Bands should remain within the dynamic range. Saturated bands are poor evidence for quantification because intensity no longer scales with abundance.
If quantification is central to the claim, use appropriately exposed images and describe the method. State the normalization strategy, the number of biological replicates, and statistical approach. The figure should show representative images, but the underlying analysis should not depend on a visually pleasing exposure alone.
Raw-image preparation before submission
Raw-image preparation is where organized labs save time. Journals may request uncropped blots and gels for all main and supplementary figures. If those files are scattered across old folders, unnamed scanner exports, and personal laptops, submission becomes stressful. Build the source-data package while creating the figure.
Start by preserving the original acquisition file. Do not overwrite it. If the instrument exports proprietary files, also save a common format such as TIFF when allowed. Avoid JPEG for source data because compression can introduce artifacts. Keep bit depth and resolution as close to acquisition as possible.
Create an annotated copy that maps the raw image to the published figure. Mark the figure number, panel letter, lane identities, sample order, molecular weight marker, exposure, and any splices. This annotated version is not a substitute for the raw file. It is a guide that helps editors verify the panel quickly.
Use a naming system that humans can understand. A file called IMG_0047.tif is not helpful during revision. A better name is Fig2B_raw_WB_pERK_exposure30s_rep3.tif. Add dates only if your lab uses them consistently. Avoid final_final_revised names because they multiply fast and create uncertainty.
Include source data for controls as well as targets. If the loading control is shown in the figure, the uncropped loading control must be available. If the target and loading control came from different membranes, provide both raw files and make the relationship clear.
Designing the final figure panel
Once the image data are honest and organized, design becomes much easier. Journal ready does not mean decorated. It means readable at publication size, consistent across panels, and aligned with the legend. Use clear panel letters, simple labels, and enough spacing to separate experiments.
Keep typography consistent. Use one font family where possible, similar label sizes, and predictable placement. Lane labels should align with lanes. Molecular weight labels should sit close enough to be understood, but not so close that they overlap bands. If a blot has many groups, consider using a small treatment table below the lanes rather than cramped text above every lane.
Use panel boundaries to show conceptual structure. If two images come from separate gels, treat them as separate panels or use visible separators. If one panel contains a target blot and its loading control, align them so the lane relationship is unmistakable. Alignment is not cosmetic. It helps readers see whether each sample has the correct control.
Legends should state what the image shows, not merely repeat the labels. Include protein or nucleic acid target, sample type, treatment, replicate meaning, and splice disclosure when relevant. If the panel is representative, say what it represents, such as one of three independent experiments with similar results.
Common mistakes that trigger reviewer questions
The most common mistake is cropping too tightly. Reviewers become suspicious when bands float in empty space with no markers, no lane context, and no visible background. A slightly larger crop often looks more trustworthy because it preserves experimental context.
Another mistake is inconsistent control presentation. A loading control shown under multiple target blots may be valid only if those targets were measured from the same sample set and the reuse is disclosed. Reusing a control image without explanation can look like duplication, even when the underlying experiment was legitimate.
Undisclosed splicing is also a frequent problem. If you removed lanes because they were irrelevant, say so. If you rearranged lanes to group treatments, mark the change. A transparent splice line is much better than an editor discovering the splice during screening.
Finally, many teams wait too long to assemble source data. During submission, they discover missing exposures, unlabeled replicates, or raw files stored in formats that are hard to open. Build source-data habits early, and these blot gel figure guidelines become routine rather than extra work.
A practical checklist before you submit
Use this checklist after the figure is designed but before journal upload. It catches the problems that usually lead to delays, clarification requests, or image integrity concerns.
- Confirm that every cropped blot or gel can be traced to an uncropped raw image.
- Check that crop boundaries do not hide relevant bands, artifacts, markers, or controls.
- Verify that all loading controls, positive controls, negative controls, and markers are labeled clearly.
- Mark every splice, lane removal, or lane rearrangement with a visible indicator.
- Explain splicing and nonadjacent lanes in the figure legend.
- Apply brightness and contrast changes to the whole image, not selected lanes or bands.
- Keep unmodified raw files separate from processed figure panels.
- Create annotated source images that map raw data to figure panels.
- Use file names that include figure number, panel, target, exposure, and replicate when useful.
- Check that the final figure remains readable at the journal size.
One more recommendation: ask a colleague outside the project to inspect the figure and raw source package. If they can identify each lane, control, crop, and splice without your live explanation, you are in good shape. If they need repeated clarification, reviewers probably will too.
Build a figure workflow your future self can defend
Strong blot gel figure guidelines are not about making researchers nervous. They are about protecting the credibility of your results. A figure that clearly shows cropping, controls, splicing, and source data is easier to review and harder to misinterpret.
The best workflow is simple. Preserve raw files, crop with restraint, disclose splices, label controls, keep adjustments global, and prepare source images as you go. Then design the panel so the story is clear without hiding the evidence. That combination gives editors what they need and gives readers confidence in your data.
Biomedical research already has enough difficult parts. Your figure preparation should not add avoidable risk. With a careful process and the right tools, journal ready blot and gel figures become a repeatable habit, not a last-minute scramble.
Frequently Asked Questions
What are blot gel figure guidelines for journal submission?
Blot gel figure guidelines are practical rules for presenting blots and gels without misrepresenting the experiment. They usually cover cropping, visible controls, splice disclosure, image adjustment, and raw source data. Following them helps reviewers connect the published panel to the original image.
Can I crop a western blot or gel for a manuscript figure?
Yes, cropping is usually acceptable when it improves readability and does not hide relevant information. Keep enough context to show the band, lane relationship, controls, and marker information when needed. Always retain the uncropped raw image in case the journal requests it.
How should I show spliced lanes in a blot figure?
Use a visible divider, gap, or other journal-approved marker wherever nonadjacent lanes are placed next to each other. Explain the splice in the figure legend, including whether the lanes came from the same blot or from separate experiments. Never make separated lanes appear continuous without disclosure.
Written by
Shobajo AbdulAzeez
Tags
Share this article